Spring Boot is a powerful framework that makes it easy to create RESTful APIs. In this article, we will go through a step-by-step guide on how to create a RESTful API in Spring Boot with MySQL and JPA. We will start by creating a new Spring Boot project and configuring it for our needs.
Step 1: Setup Development Environment
Before we begin, we need to set up our development environment. We will need to install the following software:
- Java Development Kit (JDK)
- Intellij (or any other preferred IDE like Eclipse)
- MySQL Server
Step 2: Create a Spring Boot Project
The first step is to create a new Spring Boot project using the Spring Boot Initializer.
- Open your web browser and go to Spring Initializer.
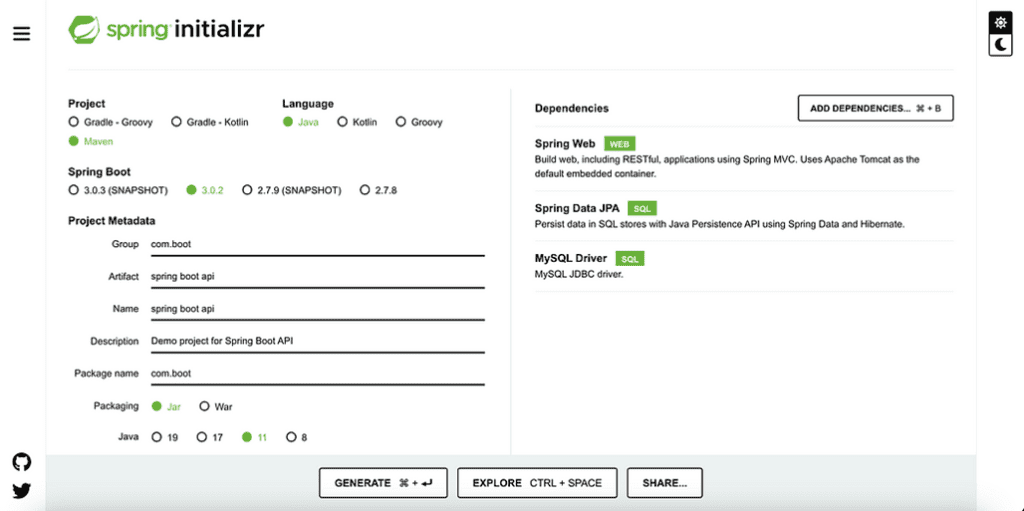
Spring Initializer — https://start.spring.io/
- Set the following options
- Project: Maven Project/Gradle according to your needs
- Language: Java
- Spring Boot: 2.6.2 (or the latest version)
- Group: com.boot
- Artifact: spring boot API/any desired info of your own choice
- Description: Demo Project for Spring Boot API/ any information you like about the project
- Packaging: Jar
- Java: 11
2. Click on the “Add Dependencies” button and add the following dependencies
i) Spring Web
ii) Spring Data JPA
iii) MySQL Driver
Select these dependencies and click on the Generate button.
Extract the downloaded project ZIP file to your preferred location. And import it in your IDE.
Step 3: Create Entity Class
Next, we need to create an entity class to represent our data model. In this example, we will create a “Product” entity class.
- Right-click on the “com.boot” package and create a package called entity inside it.
- Enter “Product” as the class name in the “entity” package and click on the “Finish” button.
- In the “Product” class, add the following code:
@Entity

@Table(name = "product")

public class Product {


    @Id

    @GeneratedValue(strategy = GenerationType.IDENTITY)

    private Long id;


    @Column(nullable = false)

    private String name;


    @Column(nullable = false)

    private double price;


    @Column(nullable = false)

    private int quantity;


    // Constructors, getters and setters, and other methods...

}
The @Entity annotation specifies that this class is an entity and should be mapped to a database table. The @Table annotation specifies the name of the database table that will store instances of this entity. The @Id annotation specifies the primary key of the entity, while the @GeneratedValue annotation specifies that the primary key should be generated automatically.
Step 4. Create Repository Interface
Now, we need to create a repository interface to handle database operations for the “Product” entity.
- Right-click on the “com.boot” package and create a package called repository or repo.
- Enter “ProductRepository” as the interface name in the package repository or repo and click on the “Finish” button.
- In the “ProductRepository” interface, add the following code:
@Repository

public interface ProductRepository extends JpaRepository<Product, Long> {}
The @Repository annotation specifies that this interface is a repository, and Spring will create an instance of it automatically. The JpaRepository interface provides a set of methods for performing CRUD(Create, Read, Update, Delete) operations on the “Product” entity.
Step 5: Create A Service Class
Next, we need to create a service class to handle the business logic for our REST API.
- Right-click on the “com. boot” package and create another package called service.
- Enter “ProductService” as the class name in the service package and click on the “Finish” button.
- In the “ProductService” class, add the following code:
package com.boot.service;


@Service

public class ProductService {

    private final ProductRepository productRepository;


    public ProductService(ProductRepository productRepository) {

        this.productRepository = productRepository;

    }

}
For saving a product in the database we will use the following code:
public Product saveProduct(Product product) {

        try {

            return productRepository.save(product);

        } catch (Exception e) {

            // Handle exception or log the error

            throw new RuntimeException("Failed to save product: " + e.getMessage());

        }

    }
To get all products from the database we will use the following code:
// Get all products

    public List<Product> fetchAllProducts() {

        try {

            return productRepository.findAll();

        } catch (Exception e) {

            // Handle exception or log the error

            throw new RuntimeException("Failed to fetch all products: " + e.getMessage());

        }

    }
For getting a single product from the database we will use the following code:
// Get a product by ID

   public Optional<Product> fetchProductById(Long id) {

        try {

            return productRepository.findById(id);

        } catch (Exception e) {

            // Handle exception or log the error

            throw new RuntimeException("Failed to fetch product by ID: " + e.getMessage());

        }

    }
For updating a single product from the database we will use the following code:
public Optional<Product> updateProduct(Long id, Product updatedProduct) {

        try {

            Optional<Product> existingProductOptional = productRepository.findById(id);

            if (existingProductOptional.isPresent()) {

                Product existingProduct = existingProductOptional.get();

                existingProduct.setName(updatedProduct.getName());

                existingProduct.setPrice(updatedProduct.getPrice());

                existingProduct.setQuantity(updatedProduct.getQuantity());

                Product savedEntity = productRepository.save(existingProduct);

                return Optional.of(savedEntity);

            } else {

                return Optional.empty();

            }

        } catch (Exception e) {

            // Handle exception or log the error

            throw new RuntimeException("Failed to update product: " + e.getMessage());

        }

    }
For deleting a single product from the database we will use the following code:
public boolean deleteProduct(Long id) {

        try {

            productRepository.deleteById(id);

            return true; // Deletion successful

        } catch (Exception e) {

            // Handle exception or log the error

            throw new RuntimeException("Failed to delete product: " + e.getMessage());

        }

    }
Step 5: Create Controller Class
Next, we need to create a controller class to handle HTTP requests for our REST API.
- Right-click on the “com. boot” package and create another package called controller.
- Enter “ProductController” as the class name in the controller package and click on the “Finish” button.
- In the “ProductController” class, add the following code:
@RestController

@RequestMapping("/api/v1")

public class ProductController {


    private final ProductService productService;


    public ProductController(ProductService productService) {

        this.productService = productService;

    }

}
The @RestController annotation specifies that this class is a controller for RESTful API requests. The @RequestMapping annotation specifies the base URL for all requests handled by this controller.
Next, we need to add methods to handle HTTP requests. In this example, we will add methods to handle GET, POST, PUT, and DELETE requests.
For Post Request, we will be using the following code:
 // Create a new product

    @PostMapping("/product")

    public ResponseEntity<Product> saveProduct(@RequestBody Product product) {

        Product savedProduct = productService.saveProduct(product);

        return ResponseEntity.ok(savedProduct);

    }
The @PostMapping annotation is used to indicate that this class will handle HTTP Post requests and return the response as JSON. It is used to map the /api/v1/products path to this class.@RequestBody is an annotation in Spring Framework used to bind the HTTP request body to a parameter in a controller method. When a client sends an HTTP POST or PUT request, it may include data in the request body. This data is typically in JSON or XML format and contains information about the resource being created or updated.
for Get Request all the products, we will be using the following code:
// Get all products

    public ResponseEntity<List<Product>> getAllProducts() {

        List<Product> products = productService.fetchAllProducts();

        return ResponseEntity.ok(products);

    }
The @GetMapping annotation is used to indicate that this class will handle HTTP Get requests and return the response as JSON. It is used to map the /api/v1/products path to this class. Here the getAllProducts() method fetches all the products and has a path /products.
for Get Request of a single product, we will be using the following code:
// Get a product by ID

    @GetMapping("/product/{id}")

    public ResponseEntity<Product> getProductById(@PathVariable Long id) {

        Optional<Product> productOptional = productService.fetchProductById(id);

        return productOptional.map(ResponseEntity::ok)

                .orElseGet(() -> ResponseEntity.notFound().build());

    }
The@PathVariable annotation is used to extract data from the URL path of an HTTP request. It is used to capture dynamic segments of a URL and map them to a method parameter in a Spring Boot controller. getProductById() method is used to get a product by id and has a path /products/{id}.
For Update Requests, we will be using the following code:
// Update a product

   @PutMapping(path = "/product/{productId}")

    public ResponseEntity<Product> updateProduct(@PathVariable Long id, @RequestBody Product product) {

        Optional<Product> updatedProductOptional = productService.updateProduct(id, product);

        return updatedProductOptional.map(ResponseEntity::ok)

                .orElseGet(() -> ResponseEntity.notFound().build());

    }
In this example, we’ve added a @PutMapping annotation for the updateProduct() method. The @PutMapping annotation is used to map HTTP PUT requests to the /product/{id} endpoint, where {id} is a path variable for the product ID. The @RequestBody annotation is used to bind the request body to the product parameter in the method. When a PUT request is made to /api/v1/product/{id}, the updateProduct() method will be executed with the id parameter set to the product ID from the URL path and the product.
For Delete Requests, we will be using the following code:
//Delte a product

 @DeleteMapping(value = "/product/{productId}")

    public ResponseEntity<String> deleteProduct(@PathVariable Long id) {

        boolean deletionStatus = productService.deleteProduct(id);

        if (deletionStatus) {

            return ResponseEntity.ok("Product with ID " + id + " has been deleted successfully");

        } else {

            return ResponseEntity.status(HttpStatus.INTERNAL_SERVER_ERROR).body("Failed to delete product with ID " + id);

        }

    }
Now, we are completed with the programming side and just remain with the database and then test the endpoints and then we are done.
First of all, we will have to configure MySql in our application.properties files.
we will add the following code in the application.properties file
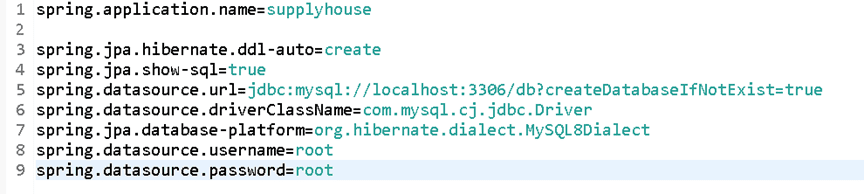
Now, after this,
we will test our API endpoints in Postman. The default port for Spring Boot is 8080. You can change the port by using the command
server.port=any port of your choice
inside the application.properties file
In my case, the port is 8080.
In my case, For our Post Request, the endpoint will be like “http://localhost:8080/api/v1/product” and the output is:
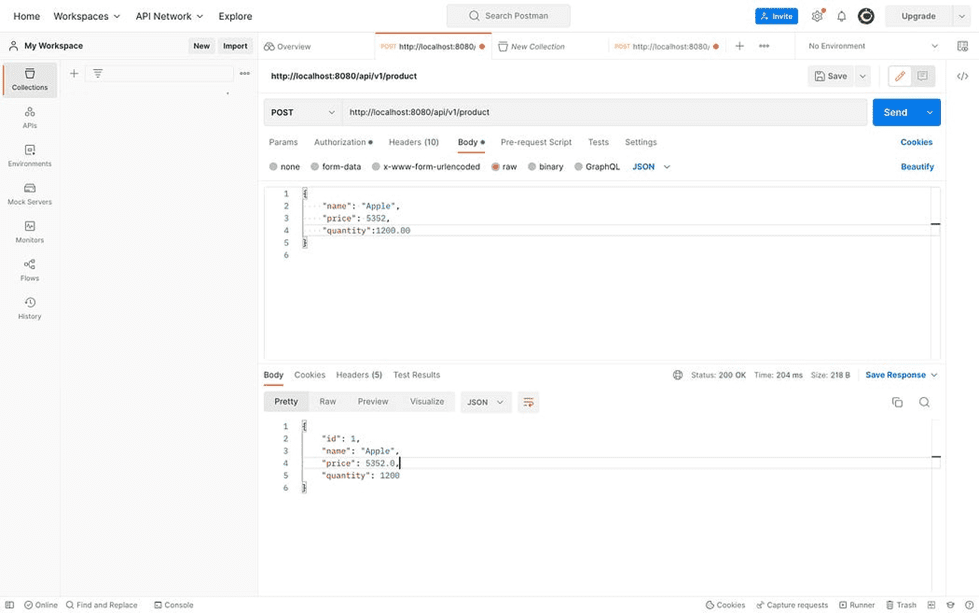
Post request
For our Get Request, the endpoint will be like “http://localhost:8080/api/v1/product” and the output is:

Get All Products
For our Get By Id Request, the endpoint will be like “http://localhost:8080/api/v1/product/id” and the output is:
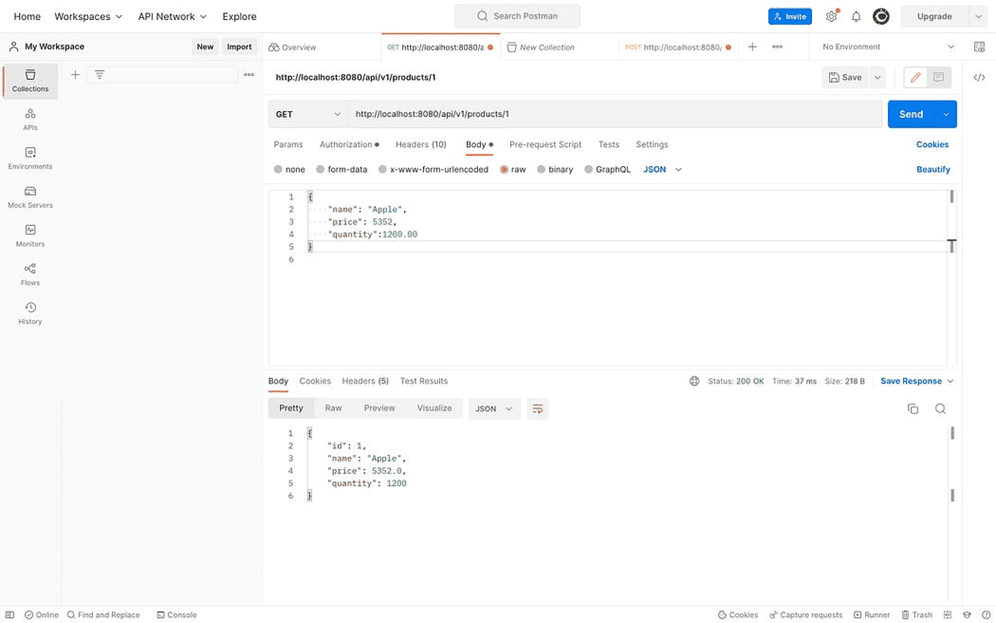
Get By Id
For our Update Request, the endpoint will be like “http://localhost:8080/api/v1/product/id” and the output is:

Update Request
And Finally,
For our Delete Request, the endpoint will be like “http://localhost:8080/api/v1/product/id” and the output is:
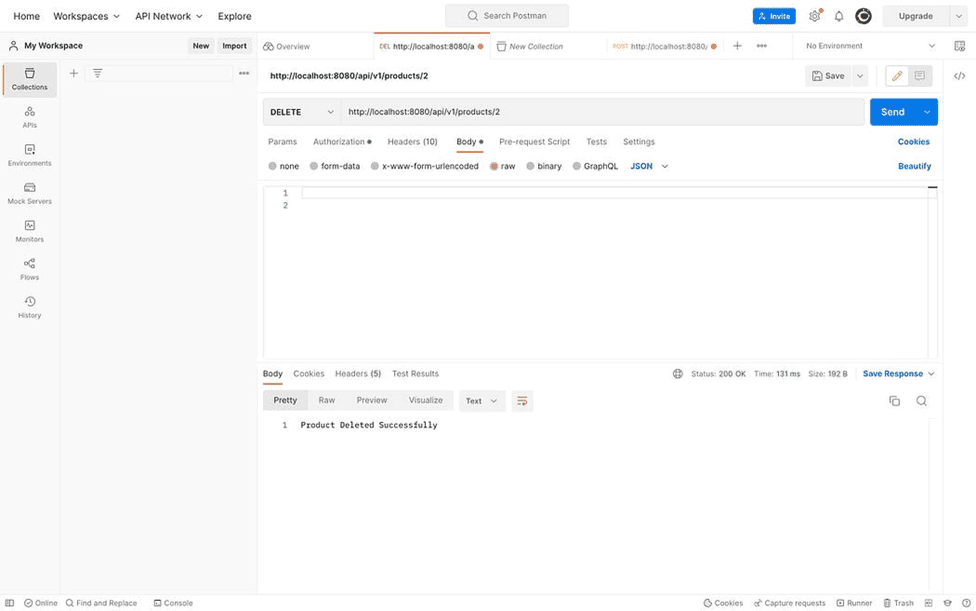
Delete Request